Introducing flannel 0.5.0 with AWS and GCE
By Ben Spoon, June 30, 2015
Originally published on the CoreOS blog (archived copy) . Re-published with the authors' permission.
Last week we released flannel v0.5, a virtual network that gives a range of IP addresses to each host to use with container runtimes. We have been working hard to add features to flannel to enable a wider variety of use cases, such as taking advantage of cloud providers' networking capabilities, as part of the goal to enable containers to effectively communicate across networks and ensure they are easily portable across cloud providers.
With this in mind, flannel v0.5 includes the following new features:
- support for Google Compute Engine (GCE),
- a client/server mode and,
- a multi-network mode.
Please refer to the readme for details on the client/server and the multi-network modes.
Try Out the New Release
In this post we will provide an overview of how to setup flannel on Amazon Virtual Private Cloud (Amazon VPC) backend introduced in flannel v0.4 and the newly added GCE backend.
When flannel runs the gce or the aws-vpc backend it does not create a separate interface as it does when running the udp or the vxlan backends.
This is because with gce and aws-vpc backends, there is no overlay or encapsulation and flannel simply manipulates the IP routes to achieve maximum performance.
Let’s get started with setting up flannel on GCE instances.
GCE Backend
From the Developers Console, we start by creating a new network.
Configure the network name and address range. Then add firewall rules to allow etcd traffic (tcp/2379), SSH, and ICMP. That's it for the network configuration. Now it’s time to create an instance. Let's call it demo-instance-1. Under the "Management, disk, networking, access & security options" make the following changes:
- Select the "Network" to be our newly created network
- Enable IP forwarding
- Under "Access and Security" set the compute permissions to "Read Write" and remember to add your SSH key
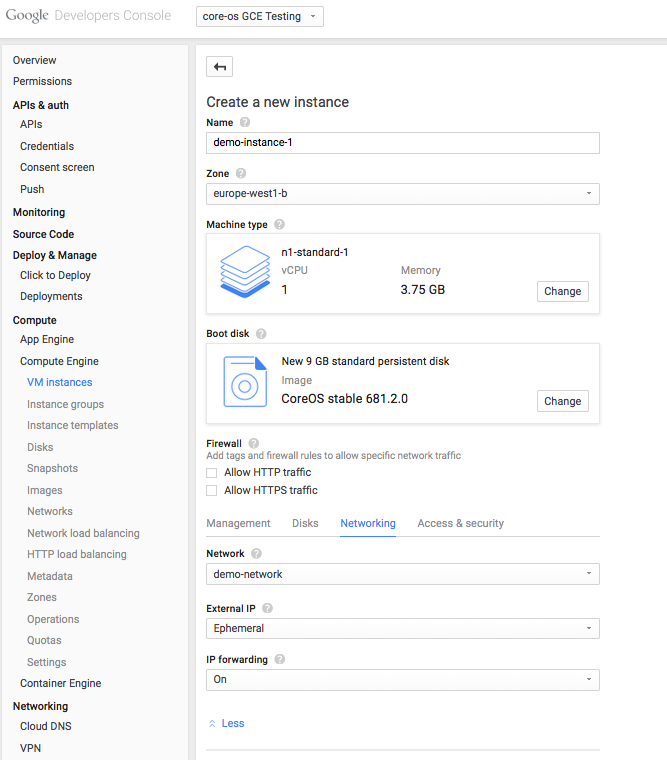
Booting a new GCE instance
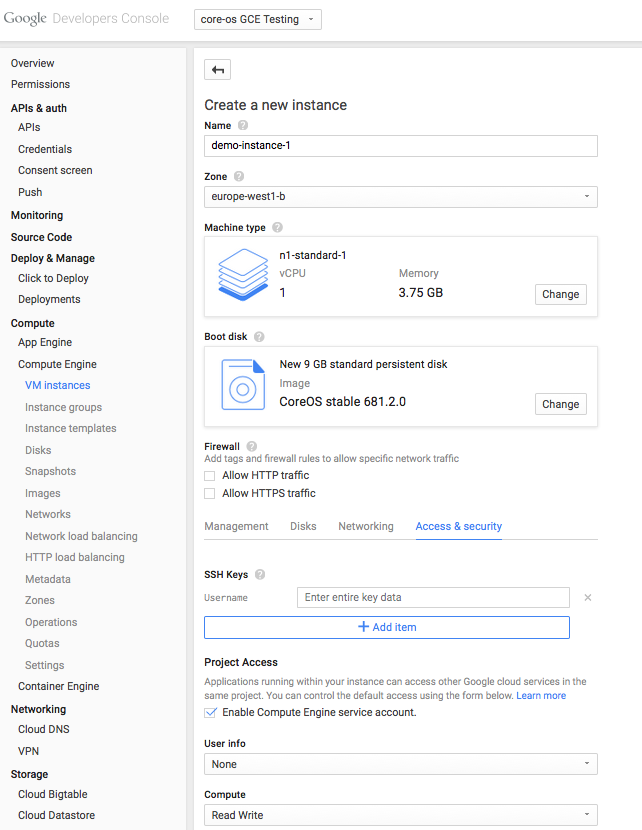
Security settings for a new instance
With the permissions set, we can launch the instance!
The only remaining steps now are to start etcd, publish the network configuration and lastly, run the flannel daemon. SSH into demo-instance-1 and execute the following steps:
- Start etcd:
$ etcd2 -advertise-client-urls http://$INTERNAL_IP:2379 -listen-client-urls http://0.0.0.0:2379
- Publish configuration in etcd (ensure that the network range does not overlap with the one configured for the GCE network)
$ etcdctl set /coreos.com/network/config '{"Network":"10.40.0.0/16", "Backend": {"Type": "gce"}}'
- Fetch the 0.5 release using wget from here
- Run flannel daemon:
$ sudo ./flanneld --etcd-endpoints=http://127.0.0.1:2379
Now make a clone of demo-instance-1 and SSH into it to run the these steps:
- Fetch the 0.5 release as before.
- Run flannel with the
--etcd-endpointsflag set to the internal IP of the instance running etcd
Check that the subnet lease acquired by each of the hosts has been added!
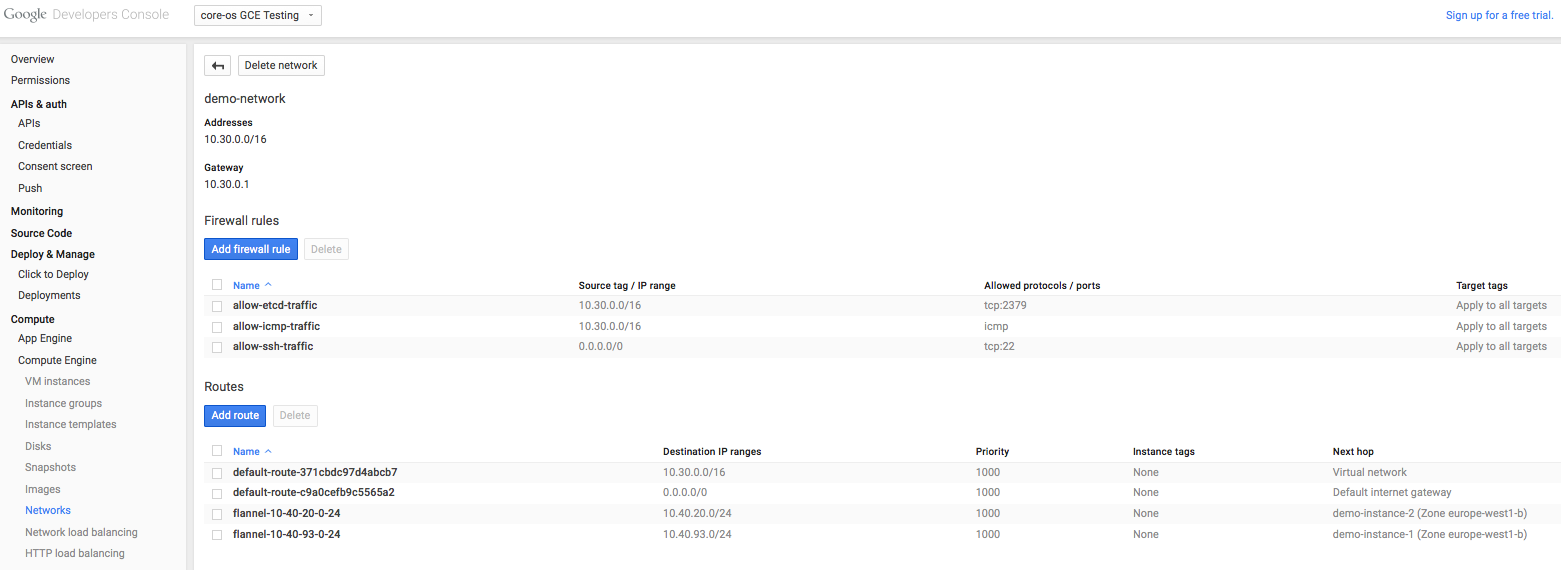
GCE Routes
It’s important to note that GCE currently limits the number of routes per project to 100.
Amazon VPC Backend
In order to run flannel on AWS we need to first create an Amazon VPC. Amazon VPC enables us to launch EC2 instances into a virtual network, which we can configure via its route table.
From the VPC dashboard start out by running the "VPC Wizard":
- Select "VPC with a Single Public Subnet"
- Configure the network and the subnet address ranges
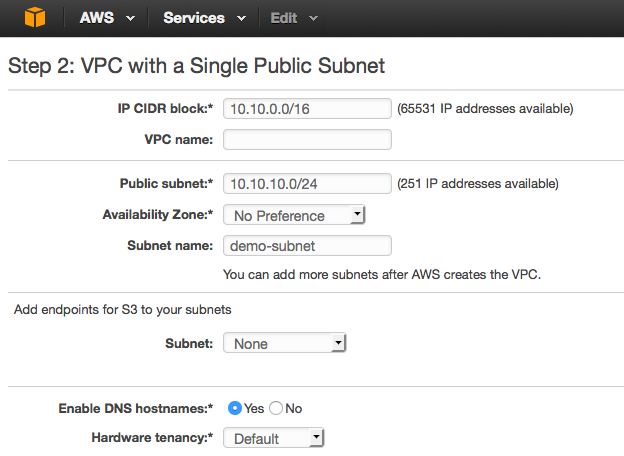
Creating a new Amazon VPC
Now that we have set up our VPC and subnet, let’s create an Identity and Access Management (IAM) role to grant the required permissions to our EC2 instances.
From the console, select Services -> Administration & Security -> IAM.
We first need to create a policy that we will later assign to an IAM role. Under "Create Policy" select the "Create Your Own Policy" option. The following permissions are required as shown below in the sample policy document.
- ec2:CreateRoute
- ec2:DeleteRoute
- ec2:ReplaceRoute
- ec2:DescribeRouteTables
- ec2:DescribeInstances
{ "Version": "2012-10-17", "Statement": [ { "Effect": "Allow", "Action": [ "ec2:CreateRoute", "ec2:DeleteRoute", "ec2:ReplaceRoute" ], "Resource": [ "*" ] }, { "Effect": "Allow", "Action": [ "ec2:DescribeRouteTables", "ec2:DescribeInstances" ], "Resource": "*" } ] }
Note that although the first three permissions can be tied to the route table resource of our subnet, the ec2:Describe* permissions can not be limited to a particular resource. For simplicity, we leave the "Resource" as wildcard in both.
With the policy added, let's attach it to a new IAM role by clicking the "Create New Role" button and setting the following options:
- Role Name:
demo-role - Role Type: "Amazon EC2"
- Attach the policy we created earlier
We are now all set to launch an EC2 instance. In the launch wizard, choose the CoreOS-stable-681.2.0 image and under "Configure Instance Details" perform the following steps:
- Change the "Network" to the VPC we just created
- Enable "Auto-assign Public IP"
- Select IAM
demo-role
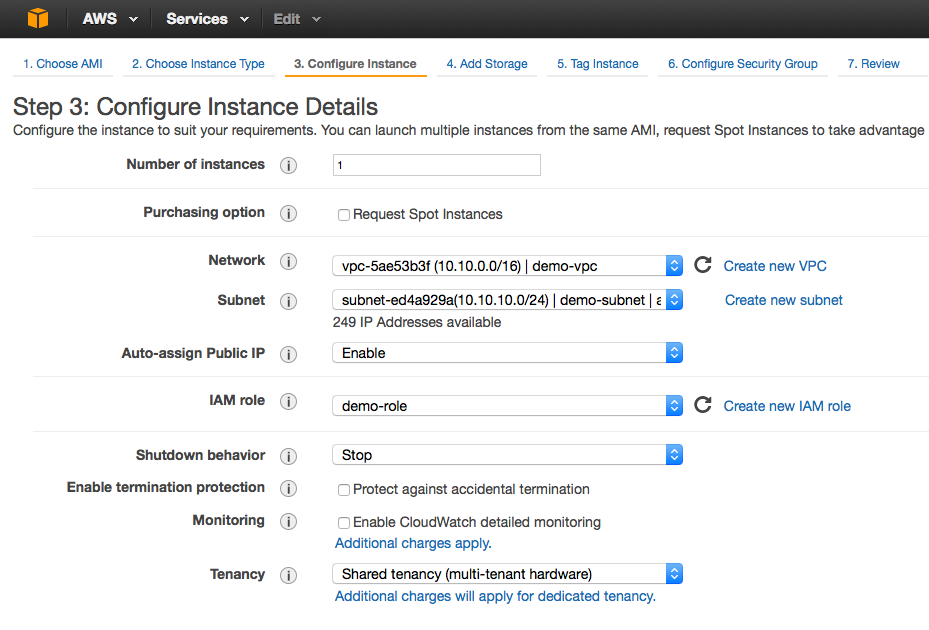
Configuring AWS EC2 instance details
Under the "Configure Security Group" tab add the rules to allow etcd traffic (tcp/2379), SSH and ICMP.
Go ahead and launch the instance!
Since our instance will be sending and receiving traffic for IPs other than the one assigned by our subnet, we need to disable source/destination checks.
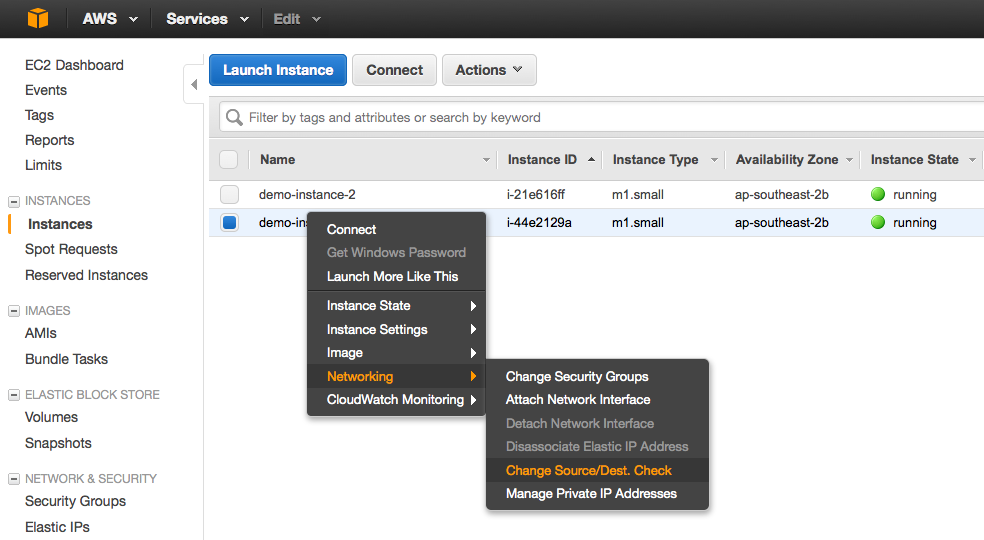
Disable AWS Source/Dest Check
All that’s left now is to start etcd, publish the network configuration and run the flannel daemon. First, SSH into demo-instance-1:
- Start etcd:
$ etcd2 -advertise-client-urls http://$INTERNAL_IP:2379 -listen-client-urls http://0.0.0.0:2379
- Publish configuration in etcd (ensure that the network range does not overlap with the one configured for the VPC)
$ etcdctl set /coreos.com/network/config '{"Network":"10.20.0.0/16", "Backend": {"Type": "aws-vpc"}}'
- Fetch the latest release using wget from here
- Run flannel daemon:
sudo ./flanneld --etcd-endpoints=http://127.0.0.1:2379
Next, create and connect to a clone of demo-instance-1. Run flannel with the --etcd-endpoints flag set to the internal IP of the instance running etcd.
Confirm that the subnet route table has entries for the lease acquired by each of the subnets.
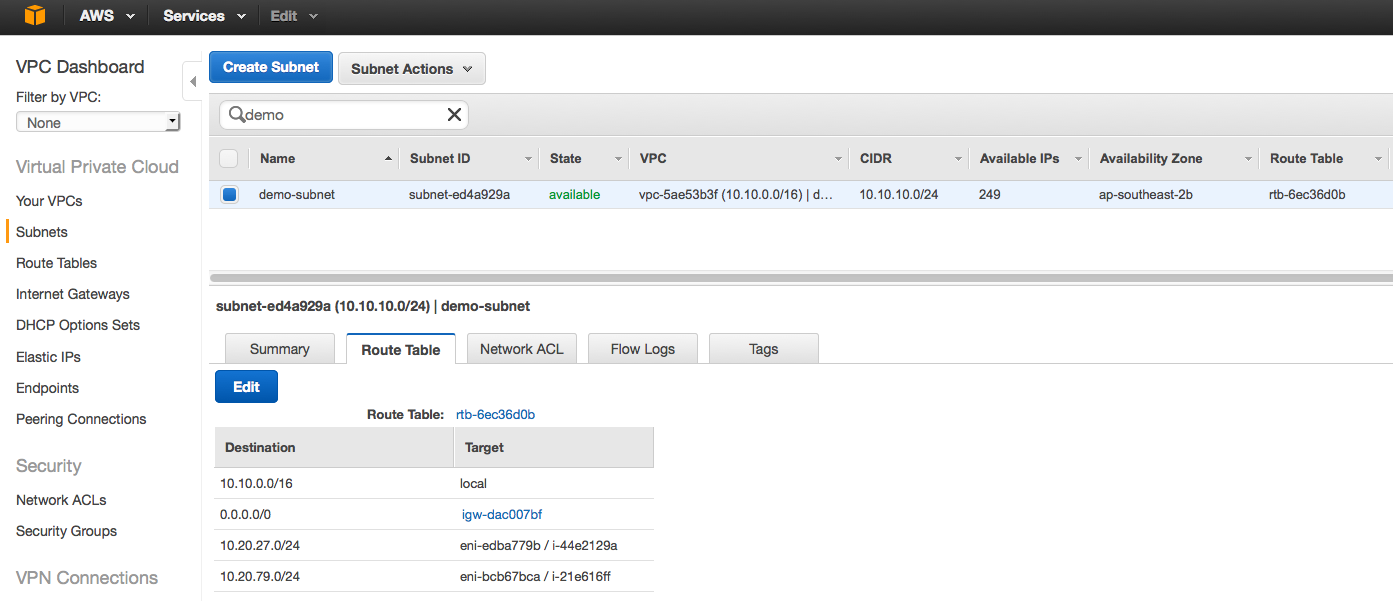
AWS Routes
Keep in mind that the Amazon VPC limits the number of entries per route table to 50.
Note that these are just sample configurations, so feel free to try it out and set up what works best for you!